It has been a long time since we've posted and we're both very sorry about that. I had a couple kids and.... well.. I don't know what my sister's excuse is, but it's probably a good one. I have a few posts I'd like to make. I need to finish posting about my son's Harry Potter themed birthday, his Curious George themed party, and also some toddler recipes and crochet projects I've been working on.
I'm going to try to post weekly so check back soon, okay.
Thursday, June 19, 2014


Saturday, April 20, 2013
Bertie Bott's Beans party favors
I finally finished the Bertie Bott's Every Flavor Beans for my son's first birthday party. I also finished and mailed the birthday invitations, but that's for another post.
First, I bought 8 packages of Bertie Bott's Beans from jellybelly.com. I wanted to have a couple of the gross flavors to put in with regular jelly beans to make the 30 party favors.


I emptied all the boxes and sorted the beans by flavor. Let me warn you.. There are A LOT of gross flavored beans in the Bertie Bott's mix. The gray, light blue, orange, brown, white, and green piles are all gross flavors. I ended up with enough to make four all gross packs and put four gross beans into each favor pack. The means there were about 200 gross beans out of eight packs of Every Flavor Beans. If I'd of known then I would have only ordered about four boxes.

Next we have the packaging for my party favors. I was trying to keep it cheap so I saved thirty of Axel's baby food containers (shown above). I spray painted them all a pale blue (I think the color was Ocean Breeze) then packed the jelly beans mixed with the Bertie Bott's beans. I ended up buying four different brands of jelly beans and mixing them all together in a big bowl then filling each container with the assorment. By starting early I was able to get a bunch of jelly beans from the Easter candy section. Then I wrapped the containers with decorative tape I bought from Target and made labels to stick on the tops.

And voila! My version of Bertie Bott's beans. The labels are kinda simple, but I like it. I tried putting images and getting fancier with the labels but I didn't like them with the pale blue containers. I ended up wasting 21 labels so if you do this them print them up on regular paper and see how they look first.
Last we'll have Licorice Wands.
First, I bought 8 packages of Bertie Bott's Beans from jellybelly.com. I wanted to have a couple of the gross flavors to put in with regular jelly beans to make the 30 party favors.


I emptied all the boxes and sorted the beans by flavor. Let me warn you.. There are A LOT of gross flavored beans in the Bertie Bott's mix. The gray, light blue, orange, brown, white, and green piles are all gross flavors. I ended up with enough to make four all gross packs and put four gross beans into each favor pack. The means there were about 200 gross beans out of eight packs of Every Flavor Beans. If I'd of known then I would have only ordered about four boxes.

Next we have the packaging for my party favors. I was trying to keep it cheap so I saved thirty of Axel's baby food containers (shown above). I spray painted them all a pale blue (I think the color was Ocean Breeze) then packed the jelly beans mixed with the Bertie Bott's beans. I ended up buying four different brands of jelly beans and mixing them all together in a big bowl then filling each container with the assorment. By starting early I was able to get a bunch of jelly beans from the Easter candy section. Then I wrapped the containers with decorative tape I bought from Target and made labels to stick on the tops.

And voila! My version of Bertie Bott's beans. The labels are kinda simple, but I like it. I tried putting images and getting fancier with the labels but I didn't like them with the pale blue containers. I ended up wasting 21 labels so if you do this them print them up on regular paper and see how they look first.
Last we'll have Licorice Wands.
Tuesday, March 19, 2013
Chocolate Frog party favors
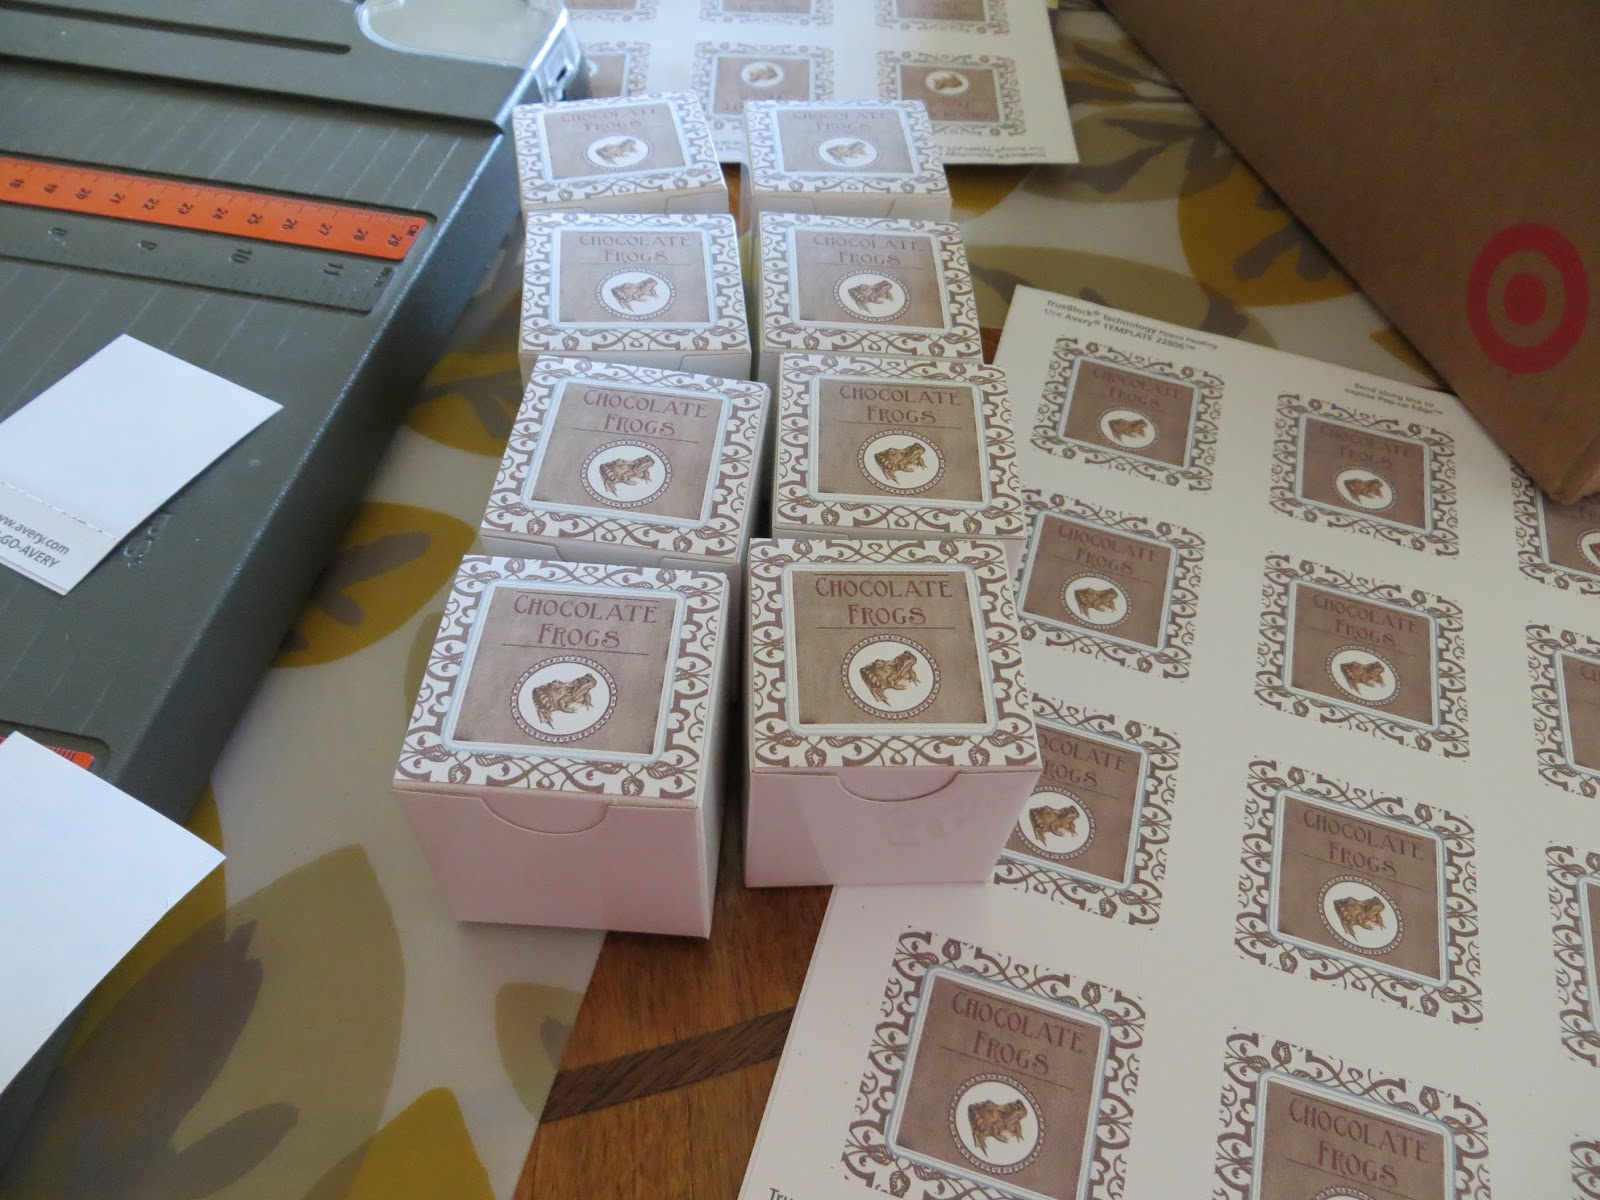
I finished the chocolate frogs for my son's Harry Potter themed first birthday party. I could have taken the easy way out and bought them for $2.99 each (?!) but since I needed thirty that would have added up to $90 for just frogs. I needed to go cheap so I figured I could make my own. In the end I spent about $23 total (or $16 if you don't count the baggies and favor boxes).
I found a soap mold at Hobby Lobby that had three frogs and three turtles on it for $2.99. I used their 40% off coupon and got it for $1.79 (woo-hoo!). I went back the next week and bought another so I'd have two molds. Again, this is why I started early.
At Joann Fabric they had their Wilton Candy Melts on sale for $2.24 a bag. I used three bags to make 30 frogs.


I had small ziploc bags left over from a baby shower I did for my sister in law. I think I paid $1.50 for 100 bags. I put the frogs in the ziploc bags because I was making them three months in advance and I wanted them to stay fresh. The white boxes were left over favor boxes from my wedding. It's amazing how these frogs just came together. I found a microwavable bottle with a squeeze top in the candy making section at Hobby Lobby. It really helped make this project a cinch.


I bought 2" square labels at Wal-Mart and downloaded a pre-made template from Avery's website. Then I searched online for a chocolate frog label and put it in the center of the Avery template. My favor boxes are 2" so I trimmed the labels a little so they would fit on the tops of the boxes better.
And voila! Chocolate frogs!

I plan on doing a nice photo shoot with all the favors once they are all finished. Up next - Bertie Bott's Beans!
I found a soap mold at Hobby Lobby that had three frogs and three turtles on it for $2.99. I used their 40% off coupon and got it for $1.79 (woo-hoo!). I went back the next week and bought another so I'd have two molds. Again, this is why I started early.
At Joann Fabric they had their Wilton Candy Melts on sale for $2.24 a bag. I used three bags to make 30 frogs.


I had small ziploc bags left over from a baby shower I did for my sister in law. I think I paid $1.50 for 100 bags. I put the frogs in the ziploc bags because I was making them three months in advance and I wanted them to stay fresh. The white boxes were left over favor boxes from my wedding. It's amazing how these frogs just came together. I found a microwavable bottle with a squeeze top in the candy making section at Hobby Lobby. It really helped make this project a cinch.


I bought 2" square labels at Wal-Mart and downloaded a pre-made template from Avery's website. Then I searched online for a chocolate frog label and put it in the center of the Avery template. My favor boxes are 2" so I trimmed the labels a little so they would fit on the tops of the boxes better.
And voila! Chocolate frogs!
I plan on doing a nice photo shoot with all the favors once they are all finished. Up next - Bertie Bott's Beans!
Thursday, February 28, 2013
Harry Potter themed birthday party
In three months I will be throwing my son's first birthday party and I decided on a Harry Potter themed party. It is quickly getting out of hand since I'm such a huge HP fan. I started working on the party favors pretty early (think November and the party is in June). I'm glad I did cause it helped me to save a lot of money and work at a pretty slow pace. I am going to break each party favor up into its own post so this is going to be a series of posts.
First up I made house scarves. I know a scarf is out of season for a June party, but they were the easiest and I figured kids would re-use a scarf before they would a tie.
I bought fleece on sale at Joann's and iron on patches online.

Then I cut the fleece into 5" wide strips making a 5" x 42" scarf. I recommend cutting the selvages off before cutting because they caused the fleece to bunch up on the end. Or maybe that was because I bought cheap fleece.

Then I cut tassels on the ends of the scarves. My tassels are 4" long and 1/2" wide.

If your fleece is like mine then there should be a fluffier side and a not-as-fluffy side. I ironed my patches on the not-as-fluffy side by putting the patch face down (with the backing facing up) and laying the scarf on top of it. I used the lines on my ironing board to make sure the patch was centered on the scarf and I positioned the patch approx. 10" from the end. To get this measurement I put on a scarf and measured when the patch would look best.
When ironing onto fleece you can't put the iron directly onto the fleece. Get a thick cotton fabric or shirt to put on top of the fleece. If you put the iron directly onto the fleece then you will mess it up. Make sure your iron is on a steam setting then run it over the patch area for about 15-20 seconds while you have a good amount of steam coming out of the iron.
And voila!

First up I made house scarves. I know a scarf is out of season for a June party, but they were the easiest and I figured kids would re-use a scarf before they would a tie.
I bought fleece on sale at Joann's and iron on patches online.

Then I cut the fleece into 5" wide strips making a 5" x 42" scarf. I recommend cutting the selvages off before cutting because they caused the fleece to bunch up on the end. Or maybe that was because I bought cheap fleece.

Then I cut tassels on the ends of the scarves. My tassels are 4" long and 1/2" wide.

If your fleece is like mine then there should be a fluffier side and a not-as-fluffy side. I ironed my patches on the not-as-fluffy side by putting the patch face down (with the backing facing up) and laying the scarf on top of it. I used the lines on my ironing board to make sure the patch was centered on the scarf and I positioned the patch approx. 10" from the end. To get this measurement I put on a scarf and measured when the patch would look best.
When ironing onto fleece you can't put the iron directly onto the fleece. Get a thick cotton fabric or shirt to put on top of the fleece. If you put the iron directly onto the fleece then you will mess it up. Make sure your iron is on a steam setting then run it over the patch area for about 15-20 seconds while you have a good amount of steam coming out of the iron.
And voila!

Saturday, February 16, 2013
Homemade Finger Paints
A little while ago I mentioned trying to make my own finger paints. Well, today I finally did. If you remember I was going to try two different recipes, one from TLC and one from Easie Peasie (see my previous post for the links cause I'm feeling a bit lazy right now and don't want to look them up). My final results are still pending (see my final results at the end of the post below), but I can give you some preliminary results.
First, Easie Peasie was way too thick.


Next, I didn't cook the first batch of the TLC long enough so it was a bit on the watery side. However it was very easy to mix the food coloring in.


I turned off the heat when the mixture was the consistency of glue and that was too soon. So, I tried again and I think the consistency was a bit better, but you do need a spoon to completely mix in the coloring. Or maybe just not fill the jar as full as I did so it will shake better. I am going to update this in a week or two when I can comment on the mold issue that some people mentioned on the Easie Peasie blog. Here's the recipe I used and some notes to help make it easier for you.
3 tablespoons of sugar
1/3 cup cornstarch
2 cups water
1/4 cup dish soap
food coloring
Mix the sugar and cornstarch in a saucepan and slowly add water stirring until the dry ingredients are completely dissolved. Cook on low, stirring constantly, until the mixture thickens. Continue for another minute until the mixture resembles a whitish gel (remove from heat if mixture starts to bubble). Slowly stir in the dish soap and remove from heat. When cool enough to handle, spoon into jars and add food coloring.
Here is what my last batch looked like just after the soap went in.

I might have cooked it a few seconds too long, but it still works nicely. This recipe will make five, 3/4 full, 4 ounce baby food jars.


In my first couple batches I used 4-8 drops of food coloring. In my last batch I used 10-12 drops. I think 8-10 drops is probably best. The red and blue painting was using my last batch of finger paints. The yellow and green were from my first couple batches. Side note - Using the dish soap in the recipe makes clean up a breeze.
I hope this helps you guys. I'll make up some more colors and post pictures... Maybe..
** Update - 24 hours later ** The Easie Peasie batch is a semi-solid substance. You can paint with it, but you have to scoop it out. The first batch of TLC paints is even more watery than before. The second batch of TLC paints is perfect (the recipe I posted above). The consistency is nice (like a firm gel) and it paints nicely. I'll update again in a couple weeks.
** Update - Feb 28 ** The finger paints have no mold. Not even a spec. And the consistency has stayed constant. This is the winner recipe!
** Update - April 17th ** The finger paints still have no mold and the consistency is still perfect. I think it's pretty safe to say that this recipe will resist molding so you can make a batch or two in advance and store it for awhile.
First, Easie Peasie was way too thick.


In order to get the green mixed I had to use a spoon. It ended up being the consistency of semi-cooled wax. Next, I didn't cook the first batch of the TLC long enough so it was a bit on the watery side. However it was very easy to mix the food coloring in.


I turned off the heat when the mixture was the consistency of glue and that was too soon. So, I tried again and I think the consistency was a bit better, but you do need a spoon to completely mix in the coloring. Or maybe just not fill the jar as full as I did so it will shake better. I am going to update this in a week or two when I can comment on the mold issue that some people mentioned on the Easie Peasie blog. Here's the recipe I used and some notes to help make it easier for you.
3 tablespoons of sugar
1/3 cup cornstarch
2 cups water
1/4 cup dish soap
food coloring
Mix the sugar and cornstarch in a saucepan and slowly add water stirring until the dry ingredients are completely dissolved. Cook on low, stirring constantly, until the mixture thickens. Continue for another minute until the mixture resembles a whitish gel (remove from heat if mixture starts to bubble). Slowly stir in the dish soap and remove from heat. When cool enough to handle, spoon into jars and add food coloring.
Here is what my last batch looked like just after the soap went in.

I might have cooked it a few seconds too long, but it still works nicely. This recipe will make five, 3/4 full, 4 ounce baby food jars.


In my first couple batches I used 4-8 drops of food coloring. In my last batch I used 10-12 drops. I think 8-10 drops is probably best. The red and blue painting was using my last batch of finger paints. The yellow and green were from my first couple batches. Side note - Using the dish soap in the recipe makes clean up a breeze.
I hope this helps you guys. I'll make up some more colors and post pictures... Maybe..
** Update - 24 hours later ** The Easie Peasie batch is a semi-solid substance. You can paint with it, but you have to scoop it out. The first batch of TLC paints is even more watery than before. The second batch of TLC paints is perfect (the recipe I posted above). The consistency is nice (like a firm gel) and it paints nicely. I'll update again in a couple weeks.
** Update - Feb 28 ** The finger paints have no mold. Not even a spec. And the consistency has stayed constant. This is the winner recipe!
** Update - April 17th ** The finger paints still have no mold and the consistency is still perfect. I think it's pretty safe to say that this recipe will resist molding so you can make a batch or two in advance and store it for awhile.
Friday, January 25, 2013
Finger Paint Experimentation
I'm in the process of planning Axel's Harry Potter themed first birthday party (don't worry, I'll post pics when the time gets closer) and I thought finger paints would make a good "potion" for potions class. I found a few different recipes while I was researching recipes on the internet and thought I would try them out. A few people mentioned the paints molding after a week so I'm gonna follow and then tweak a few recipes til I get one that's just right. If you're interested I'm starting out with these recipes:
http://easiepeasie.blogspot.com/2010/07/homemade-finger-paints.html
http://tlc.howstuffworks.com/family/make-your-own-fingerpaint.htm
One commenter on the first link mentioned the sugar causing the mold so I will try once with the sugar and once without. I'll take pictures and post my final results in a week or so along with the recipe that worked out best for me.
Stay tuned!
http://easiepeasie.blogspot.com/2010/07/homemade-finger-paints.html
http://tlc.howstuffworks.com/family/make-your-own-fingerpaint.htm
One commenter on the first link mentioned the sugar causing the mold so I will try once with the sugar and once without. I'll take pictures and post my final results in a week or so along with the recipe that worked out best for me.
Stay tuned!
Wednesday, January 16, 2013
Baby food container crafts
I know it's been awhile since I've posted and this post will have a part 2 that won't happen for several weeks, but I thought I would post about it anyway.
I recently acquired this:
 I never really thought about how many of these containers I might go through until someone gave us several dozen jars of baby food. Suddenly all I could think about was emptying them out and crafting with them. I have a few ideas on what I want to do, but I'm not going to share just yet. I promise that I will post pictures of what I make as soon as I get the stuff made.
I recently acquired this:

Tuesday, September 18, 2012
Baby Clothes on a Budget
Hi Everyone! Sorry it's been so long since I last posted. A lot has happened in the past few months. I had a baby boy, (and he is steadily growing like a weed), I went back to work, and then I quit work. I'm now a stay at home mom on a budget and it's AWESOME. I love seeing my son's smiling face when I greet him first thing in the morning. I love not being so exhausted that I barely have the energy to rock my son to sleep. And most of all - I love that I am being creative again.
I just thought of, completed, and now blogged about a baby clothes project. Awesome right??
I hate onesies. I hate that ALL the baby clothes for infants under 12 months are always onesies. Do you want to know why I hate them? Aside from the fact they look ugly (who wears all their shirts tucked into their pants?). They are a pain to change diapers in. Especially if you have a breastfed baby that mere mortal diapers can't contain their bowel movements. It never fails, his poo will explode out the back or front of his diaper, then when I try to get the onesie off I end up smearing poop all the way up to his ears. I hate that.
I have a million onesies, about a dozen shorts/pants, and only two actual shirts. I went to three different stores looking for regular shirts and apparently they don't exist. So, on the way back from the store today I had an idea. Why don't I turn all those onesies into shirts? It would be easy right?
Turns out, it is. (I apologize, since I don't work anymore I don't have access to all my photo programs so some of these pictures are awful and I can't resize them).
I started with a thin crappy onesie that I bought. It was supposed to be for babies 3-9 months (really? That should have been a sign, I know) but it turned out to be for 3 month old babies and the fabric is thin. So it's going to be my guinea pig.


First, you cut straight across the bottom removing the snaps and trim.


Then you fold up the bottom and sew. I used a zigzag stitch so it would still stretch at the bottom. I managed to spit out 5 of these puppies in about 5 minutes. Be careful not to stretch the knit as you sew. If you do then the fabric will ruffle. Just let the machine pull it through.

One of the onesies I did had a plastic-y image printed on it. My machine didn't like it. I think the plastic was sticking to the foot so it couldn't slide it through very well. Maybe next time I will try a quilting foot with top and bottom feeders.

And here's my angel relaxing in dad's chair sporting one of his new shirts.
I hope you enjoyed this. I know I did. Now my son has shirts to wear with all those shorts.
Thursday, April 26, 2012
Nursery photo
My nursery is about as finished as it is going to be and I am not sure how I feel about it. I wanted to do something that was over the top, but my energy just didn't allow for that. This is what I had the energy for.

I taped off all the stripes and painted them in one weekend. FYI - I don't recommend that for a 7 month pregnant woman. I was pretty much useless afterward for about 3 days. I also painted stripes on the opposite wall. I used the blue and brown because I wanted to breakup all the green that was in the room. If you look closely you can see the pillow I made from a window valance that I mentioned in an earlier post. We had the rocking chair refinished and reupholstered to match the nursery. And because it was in serious need of a face lift.
All that hard work is worth it though. In about 6 weeks I will have this little guy in my arms and he will need a stylish place to sleep.


I taped off all the stripes and painted them in one weekend. FYI - I don't recommend that for a 7 month pregnant woman. I was pretty much useless afterward for about 3 days. I also painted stripes on the opposite wall. I used the blue and brown because I wanted to breakup all the green that was in the room. If you look closely you can see the pillow I made from a window valance that I mentioned in an earlier post. We had the rocking chair refinished and reupholstered to match the nursery. And because it was in serious need of a face lift.
All that hard work is worth it though. In about 6 weeks I will have this little guy in my arms and he will need a stylish place to sleep.

Friday, April 13, 2012
2nd Trimester Energy
Hey everyone! A couple of weeks ago my husband was out of town and I realized that all my extra 2nd trimester energy was probably going to run out soon. I also realized that I had made a quilt for my sister-in-law's future baby, but I had not made one for mine. I wish I had of taken a picture of the quilt I made for her. The colors were a beautiful orange, brown, blue and green. Soft shades like sea glass. I didn't know if she was having a boy or girl so I tried to make it gender neutral. The backing was a chocolate brown flannel so it would be soft on baby's skin. Lovely. And I didn't take a single photo. All I can say is pregnancy brain.
Well, I ended up making 2 quilts for my future son. One was more subdued and one was bright and fun. I had my husband in mind when I picked out the subdued color scheme and the bright one fits my personality. Believe it or not, both of these quilts were made with fabric I already had on hand. I didn't have to purchase anything. That probably indicates a problem of some kind, but I will choose to ignore that.
 First up we have the fun quilt I made for myself. I used the remaining strips from a jelly roll I used on an earlier project and then picked some remaining fabric to fill in the gaps. The whole quilt is made with 2 1/2" strips. Except for the corners. I was going to cut the frog fabric into strips, but I like the idea of using triangles instead. That way all the little creepy critters were visible. Actually, after I had it all sewn together I kinda wished I had used the frog fabric for my center square also. Oh well.

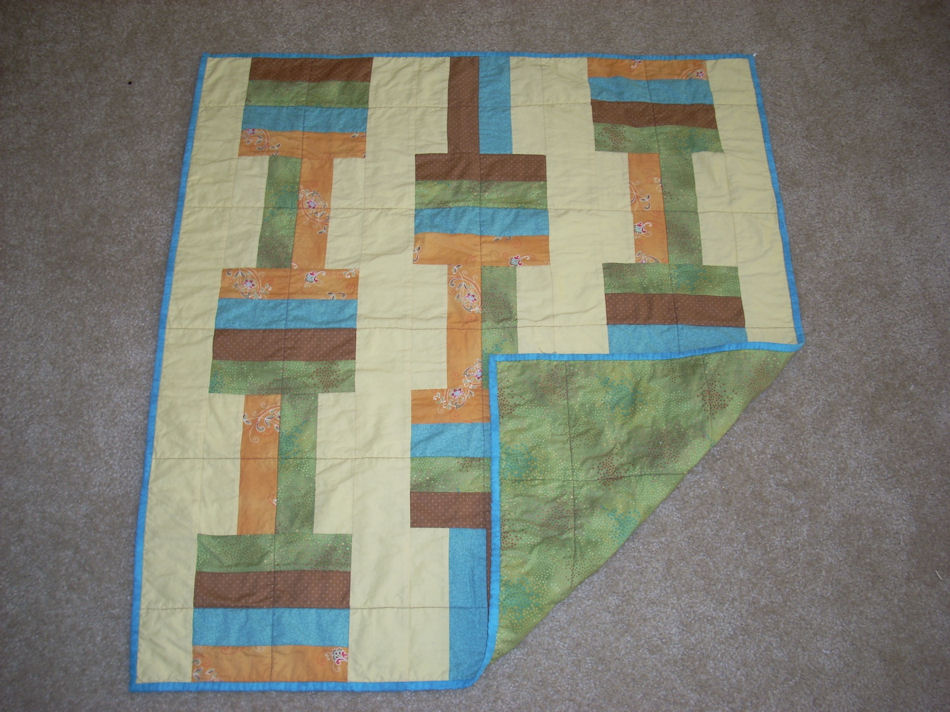
 My husband likes Earthy colors. He tolerates the bright punchy stuff because he is married to me :o). So when I laid out this color scheme I knew he would like it. It's a really simple layout that I first saw on this site. It looked easy enough to figure out. I cut 2 1/2" strips from my fabrics and sewed four of them together then cut 8 1/2" squares and squared them up. Next I sewed two 2 1/2" strips of my fabric to two 2 1/2" strips of background fabric and cut them into 8 1/2" squares. The strips between the rows is 3 1/2" wide. Then I assembled them.
 The backing is an olive colored fabric that I had several yards of and the binding is left over from another project I started, but never quite finished. I showed my husband both my quilts when he got home and he picked this one as his favorite. Do I know him or what? I wanted him to have something he likes for when he is toting our son around. I can't pick out all our son's stuff and still expect my hubby to get excited about it.
Well, I ended up making 2 quilts for my future son. One was more subdued and one was bright and fun. I had my husband in mind when I picked out the subdued color scheme and the bright one fits my personality. Believe it or not, both of these quilts were made with fabric I already had on hand. I didn't have to purchase anything. That probably indicates a problem of some kind, but I will choose to ignore that.


The backing is just a basic white with a tiny floral print imprinted on it. My binding is a bright blue. I love this quilt. It makes me happy just to look at it and all the bright greens, yellows, and blues. I hope my son likes it too.
 My husband likes Earthy colors. He tolerates the bright punchy stuff because he is married to me :o). So when I laid out this color scheme I knew he would like it. It's a really simple layout that I first saw on this site. It looked easy enough to figure out. I cut 2 1/2" strips from my fabrics and sewed four of them together then cut 8 1/2" squares and squared them up. Next I sewed two 2 1/2" strips of my fabric to two 2 1/2" strips of background fabric and cut them into 8 1/2" squares. The strips between the rows is 3 1/2" wide. Then I assembled them.
 The backing is an olive colored fabric that I had several yards of and the binding is left over from another project I started, but never quite finished. I showed my husband both my quilts when he got home and he picked this one as his favorite. Do I know him or what? I wanted him to have something he likes for when he is toting our son around. I can't pick out all our son's stuff and still expect my hubby to get excited about it.
Shortly after completing both of these quilts I entered my 3rd trimester and my energy level has gone waaay down. So much so that I don't want to get off the couch most times. I do, but I really don't want to. Now all I need are really hot days and I will be set. Set to have this baby anyway.
I hope you all have a great weekend. One more hour and I am outta here!
Thursday, March 22, 2012
Green Elephant Nursery
Hey guys! I decided to show you some of my in-progress nursery pictures. It's the other craft I wanted to show a couple of days ago, but decided that Blogger's format was too frustrating to mess with. Lets hope today goes a little better.
 This is a throw pillow I made out of the valance that came with the set. I don't like window valances so I wanted to do something else with it. Now, this pillow won't stay in the crib because that is a hazard for my little bundle. We are having an old rocker style chair refinished and this pillow will go on it when we get it back. I don't have any progress shots, but basically I ripped all the seams out of the valance giving me the brown panel with the elephants, the green corduroy I used for the trim, and a solid brown panel with no design. Then I cut the panel with the elephants I wanted. There was a whole parade of elephants so I had to cut between them to get the two I wanted. Then I stitched a strip of the green to the top and to the bottom. The back of the pillow is just the solid brown panel cut to fit. I ironed some fusible batting to the front and back to keep the pillow from being lumpy, then I sewed them together, turned right side out and stuffed. I still have enough materials left over for a second pillow if I want. I am going to wait until I have the chair back so I can see how the one looks first.
 Next I have the bumper. This was originally a four sided bumper. My crib converts to a toddler bed by removing the front side of the crib so I wanted the bumper to also have a removable front. Now, I have read online that using a bumper is not recommended. After reading all the reasons why I decided that I would find a bumper that didn't have the same issues they warn you against. One issue is if the bumper is too soft the baby may pull it on top of themselves and suffocate. You can't see in the photo, but my bumper is made out of a rigid foam so even if he manages to pull it down it won't cover his face. Another issue is the restriction of air flow inside the crib causing carbon dioxide buildup. By removing the front (which I wanted to do anyway) I am allowing the air to flow freely. Let's look at a closer picture.
 I used some of the scraps from the valance to mimic the binding on the bumper. Then I sewed my new binding to the end to cover my exposed edge. I also had to make a couple of extra straps for the other end of the bumper and sew those into place. I apologize, but I don't have a picture of the other end. Since that end was already finished I didn't do anything else with it. It doesn't have the green binding like the end I finished, but the bumper was too thick for my machine so I couldn't add it. If you look closely in the top picture you can see that one side has the green binding and one side doesn't. I am okay with leaving it like that.
When I get the whole nursery finished then I will post a picture. Right now I am working on painting an elephant/jungle theme on the walls and my husband is working on getting a shelf up for our bed time reading.
Whew! Two posts in one week, I am exhausted. I think I have this new format figured out so this post wasn't too painful. Hopefully I will have more to follow soon.


When I get the whole nursery finished then I will post a picture. Right now I am working on painting an elephant/jungle theme on the walls and my husband is working on getting a shelf up for our bed time reading.
Whew! Two posts in one week, I am exhausted. I think I have this new format figured out so this post wasn't too painful. Hopefully I will have more to follow soon.
Tuesday, March 20, 2012
Crappy In-Laws, Rainy Weather, and Crafts
Hello everyone! I am having a really crappy day and I thought blogging about a couple of crafts I have done might make me feel better. First off I will start with an apron I made out of two 20" cloth napkins. I first saw this site a while ago and wanted to make an apron like she did. https://www.craftstylish.com/item/3661/make-one-adorable-apron-from-two-colorful-napkins
Unfortunately I couldn't find napkins as cute as she did.

 Now you want to measure where you want the strings to tie and the pockets to start. I made my apron as long as it would go and stitched the second apron to the very edge of the bottom of the first. I stitched as close to the edge on the backside since that part will be exposed. The front seam will be covered with the ribbon. This is a picture of the front.
 Measure how long you want your apron strings to be and cut your ribbon to that length. Then pin the ribbon into place and stitch along the top and bottom of the ribbon.

 When your ribbon is in place fold the bottom half of the apron up to form the pockets. Line up the edges so they are even and sew along the two open ends.
I made two evenly sized pockets by sewing one seam straight down the middle. You could add more pockets if you wanted.
 Lastly, measure how long you want your top strap to be and cut your ribbon to length. I tucked the ends of the ribbon into the pleats and sewed one seam straight across the whole front. Your apron is now complete.
Allow me to finish by saying I hate the new format for posting photos to our blog. This short post was a huge headache to get organized. I hope you enjoyed this. My apron is lovely and I may give it as a gift. I already own about 6 aprons so I really don't need another. I was going to post another craft I did, but I think I will stop here for now. Hope your day is going better than mine.
Unfortunately I couldn't find napkins as cute as she did.

This is what I found instead. Two 20" green stripe napkins and a matching ribbon I liked. First press your napkins so they aren't too wrinkled. 

For the top of the apron press two pleats running vertically down the napkin. Make sure they are even on both sides and measure against your chest to make sure the width of the top of the apron is comfortable. You don't want the bottom of the apron to be pleated so make sure the pleats gradually widen out.
 Next sew your pleats into place. It is hard to tell in the picture but I stitched just a little inside the edge of the pleat all the way to the bottom. I stopped about 2" from the bottom of the napkin.
 Next sew your pleats into place. It is hard to tell in the picture but I stitched just a little inside the edge of the pleat all the way to the bottom. I stopped about 2" from the bottom of the napkin.
 Now you want to measure where you want the strings to tie and the pockets to start. I made my apron as long as it would go and stitched the second apron to the very edge of the bottom of the first. I stitched as close to the edge on the backside since that part will be exposed. The front seam will be covered with the ribbon. This is a picture of the front.

 When your ribbon is in place fold the bottom half of the apron up to form the pockets. Line up the edges so they are even and sew along the two open ends.
I made two evenly sized pockets by sewing one seam straight down the middle. You could add more pockets if you wanted.

Allow me to finish by saying I hate the new format for posting photos to our blog. This short post was a huge headache to get organized. I hope you enjoyed this. My apron is lovely and I may give it as a gift. I already own about 6 aprons so I really don't need another. I was going to post another craft I did, but I think I will stop here for now. Hope your day is going better than mine.
Wednesday, February 1, 2012
Happy New Year everyone!! I know that I am a month late-better late than never right? I hope that the holidays were enjoyable. Did we all make good resolutions for the new year? I know that I made quite the long list of things that I would like to accomplish- Fingers crossed that I do at least half of them :0) My biggest wishes for this year are to stay smoke free, to blog/craft more and to get back into school. Heres to hoping for the best.
Anywho,
I was digging through old pictures and I came across this and wanted to share:
These are my two older sons. They are so cute and it seems like it wasn't that long ago. They grow up so fast. They are both teenagers now in high school and driving. Hopefully I can keep the 10 year old young for at least a little longer.
 Figured that I might as well complete the family :0) Here is a photo of my husband and I together. I am rarely in photos-I prefer to be the one taking them.
 2011 was a great year, I hope that 2012 is even better!
Have a GREAT year!
Lesley
Anywho,
I was digging through old pictures and I came across this and wanted to share:
These are my two older sons. They are so cute and it seems like it wasn't that long ago. They grow up so fast. They are both teenagers now in high school and driving. Hopefully I can keep the 10 year old young for at least a little longer.
Figured that I might as well complete the family :0) Here is a photo of my husband and I together. I am rarely in photos-I prefer to be the one taking them.2011 was a great year, I hope that 2012 is even better!Have a GREAT year!
Lesley
Monday, January 16, 2012
How to bind a quilt
Good morning! I sincerely apologize for not posting sooner. I have no excuses, except laziness. I have good news though. I finally finished the quilt I was working on so I can post about quilt binding.
First - We need to sew all the 2 1/2" binding strips together to make one REALLY long strip. Now there are two ways to do this. I sew the strips together at a diagonal so the binding is smoother. If you sew the strips with a vertical seam then there is a bump in the binding where the seams are. I will show you are picture of what I mean a little further down. After sewing your strips together, trim your excess fabric leaving a 1/4" seam allowance.


Before you trim your seams, open up your strips and make sure you sewed in the right direction. You should have a straight strip. Now you get to press.

Press your seams open and your strip in half lengthwise.

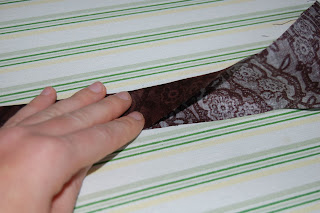
Now that I have pressed my strip in half I can show your how the diagonal seam is better. If I had of sewn a vertical seam then it would have made two seams on top of each other. When I sew the binding to the quilt then that would have left a bump for my machine to sew through. Just trust me - this is better.


Now that our binding is finished (or before, it really doesn't matter) you want to trim your quilt to make sure it is "square". I measured 3 1/2" from my blocks and trimmed all the way around. Next you start pinning your binding to your quilt. Match up the unfinished edges and pin until just before the corner. Make sure you leave a long tail. This will be used at the end. Mine is about 12" long. Mark 1/4" before the corner. You will sew the binding to the quilt up to this point.


Hand stitch up and down both sides of the corner to hold your fabric in place and continue around the rest of your quilt. Now you have finished a whole quilt!

First - We need to sew all the 2 1/2" binding strips together to make one REALLY long strip. Now there are two ways to do this. I sew the strips together at a diagonal so the binding is smoother. If you sew the strips with a vertical seam then there is a bump in the binding where the seams are. I will show you are picture of what I mean a little further down. After sewing your strips together, trim your excess fabric leaving a 1/4" seam allowance.


Before you trim your seams, open up your strips and make sure you sewed in the right direction. You should have a straight strip. Now you get to press.

Press your seams open and your strip in half lengthwise.


Now that I have pressed my strip in half I can show your how the diagonal seam is better. If I had of sewn a vertical seam then it would have made two seams on top of each other. When I sew the binding to the quilt then that would have left a bump for my machine to sew through. Just trust me - this is better.


Now that our binding is finished (or before, it really doesn't matter) you want to trim your quilt to make sure it is "square". I measured 3 1/2" from my blocks and trimmed all the way around. Next you start pinning your binding to your quilt. Match up the unfinished edges and pin until just before the corner. Make sure you leave a long tail. This will be used at the end. Mine is about 12" long. Mark 1/4" before the corner. You will sew the binding to the quilt up to this point.


You stop sewing 1/4" from the corner like shown. After you have stopped at the corner pull your quilt out of the machine a little so you have some working room. 


Now, I got a little ahead of myself when I was sewing the corners so don't let my pictures confuse you. Fold your binding strip straight up like shown. Be careful to keep the raw edge line straight. Finger press the fold and hold it. Then fold the flap down, again keeping your raw edges straight.


Put it back into your machine and turn the corner, then measure 1/4" from the edge and start sewing. This will leave you with a flap at the corner. Keep going all the way around the quilt until you come close to the "tail" you have left. Make sure your leave about 12" between your starting stitch and your ending stitch. You can leave a little more if you like. You want to make sure you have enough room to pull the binding away so you can sew the ends closed.


Once you have neared the end lay out your "tail" and fold the end up like shown. If your tail is too close to your ending stitch or it overlaps then you can trim it shorter. Just make sure you have enough of your binding to finish the quilt. Lay the ending binding across your folded end and pin into place. You will be sewing a diagonal stitch here to secure your ends.


Stitch your binding ends together like so. After they are stitched lay everything flat to make sure your don't have any excess binding and to make sure your seam was sewn in the correct direction. When everything lays properly you can trim your excess fabric leaving 1/4" seam allowance. Finger press the seam open and finish sewing the binding to the quilt.


Now that your binding is attached you don't need your machine any more. The rest is hand sewn while sitting on the sofa watching some good T.V. Fold the binding around to the back of the quilt covering the seam and hand stitch into place. I am not sure what this stitch is called, sorry. Just be careful that you don't go all the way through the quilt. You just want to go through the first layer of fabric.


When you get to your corner you want to fold the fabric so you have a nice, neat corner. Finger press the fabric like shown. You can pin it if necessary, but you want to make sure the fabric lines up nicely. You also want to make sure the front of the corner and the back of the corner are folded the same direction.


Hand stitch up and down both sides of the corner to hold your fabric in place and continue around the rest of your quilt. Now you have finished a whole quilt!

This was a long drawn out process and I apologize. Usually you can have a quilt finished in a few days. If you remember back to the quilt I made for my living room, that one took a day and a half. It was a very easy layout. Looking back it probably would have been a better quilting tutorial.
Subscribe to:
Posts (Atom)