Good morning! I sincerely apologize for not posting sooner. I have no excuses, except laziness. I have good news though. I finally finished the quilt I was working on so I can post about quilt binding.
First - We need to sew all the 2 1/2" binding strips together to make one REALLY long strip. Now there are two ways to do this. I sew the strips together at a diagonal so the binding is smoother. If you sew the strips with a vertical seam then there is a bump in the binding where the seams are. I will show you are picture of what I mean a little further down. After sewing your strips together, trim your excess fabric leaving a 1/4" seam allowance.


Before you trim your seams, open up your strips and make sure you sewed in the right direction. You should have a straight strip. Now you get to press.

Press your seams open and your strip in half lengthwise.

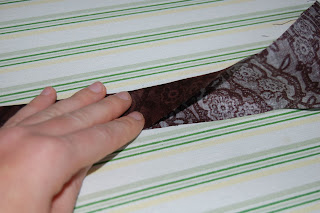
Now that I have pressed my strip in half I can show your how the diagonal seam is better. If I had of sewn a vertical seam then it would have made two seams on top of each other. When I sew the binding to the quilt then that would have left a bump for my machine to sew through. Just trust me - this is better.


Now that our binding is finished (or before, it really doesn't matter) you want to trim your quilt to make sure it is "square". I measured 3 1/2" from my blocks and trimmed all the way around. Next you start pinning your binding to your quilt. Match up the unfinished edges and pin until just before the corner. Make sure you leave a long tail. This will be used at the end. Mine is about 12" long. Mark 1/4" before the corner. You will sew the binding to the quilt up to this point.
You stop sewing 1/4" from the corner like shown. After you have stopped at the corner pull your quilt out of the machine a little so you have some working room.


Now, I got a little ahead of myself when I was sewing the corners so don't let my pictures confuse you. Fold your binding strip straight up like shown. Be careful to keep the raw edge line straight. Finger press the fold and hold it. Then fold the flap down, again keeping your raw edges straight.
Put it back into your machine and turn the corner, then measure 1/4" from the edge and start sewing. This will leave you with a flap at the corner. Keep going all the way around the quilt until you come close to the "tail" you have left. Make sure your leave about 12" between your starting stitch and your ending stitch. You can leave a little more if you like. You want to make sure you have enough room to pull the binding away so you can sew the ends closed.
Once you have neared the end lay out your "tail" and fold the end up like shown. If your tail is too close to your ending stitch or it overlaps then you can trim it shorter. Just make sure you have enough of your binding to finish the quilt. Lay the ending binding across your folded end and pin into place. You will be sewing a diagonal stitch here to secure your ends.
Stitch your binding ends together like so. After they are stitched lay everything flat to make sure your don't have any excess binding and to make sure your seam was sewn in the correct direction. When everything lays properly you can trim your excess fabric leaving 1/4" seam allowance. Finger press the seam open and finish sewing the binding to the quilt.
Now that your binding is attached you don't need your machine any more. The rest is hand sewn while sitting on the sofa watching some good T.V. Fold the binding around to the back of the quilt covering the seam and hand stitch into place. I am not sure what this stitch is called, sorry. Just be careful that you don't go all the way through the quilt. You just want to go through the first layer of fabric.
When you get to your corner you want to fold the fabric so you have a nice, neat corner. Finger press the fabric like shown. You can pin it if necessary, but you want to make sure the fabric lines up nicely. You also want to make sure the front of the corner and the back of the corner are folded the same direction.


Hand stitch up and down both sides of the corner to hold your fabric in place and continue around the rest of your quilt. Now you have finished a whole quilt!

This was a long drawn out process and I apologize. Usually you can have a quilt finished in a few days. If you remember back to the quilt I made for my living room, that one took a day and a half. It was a very easy layout. Looking back it probably would have been a better quilting tutorial.

 Figured that I might as well complete the family :0) Here is a photo of my husband and I together. I am rarely in photos-I prefer to be the one taking them.
 2011 was a great year, I hope that 2012 is even better!


